Monday, May 31, 2010

Homemade Butter

OK, I seriously didn't believe it would be so easy.  I read a blog post HERE and thought I'd try it.  The comments below the post also have some interesting information.  Here's what I did:

1 pint of Heavy Whipping Cream
dash of salt
Hand Mixer (not a stand mixer - like a Kitchenaid)

I used a larger bowl than I thought I'd need and it turns out that was a good idea!!!

Beat your Heavy Whipping Cream for a long time!  First, it turns into whipped cream, which is great for desserts!!!  At that point, I added a little salt.  I have no idea how much, just a few shakes of the salt shaker.

Keep mixing.  At some point (around 20 minutes of mixing for me), you'll start to see a milky liquid separating from the solids.  The liquid is buttermilk.  You can save it and use it if you want.  Press the solid butter into a mound and you'll see the buttermilk seeping out of it.  Keep pressing and then pour out the buttermilk.  Run cold water into your bowl and press on the butter again.  Discard the liquid.  I rinsed the butter probably 3 times.

And now you have homemade butter.  You don't have to do the pressing and rinsing part, but your butter supposedly won't last as long in the fridge.

I ended up with about 3/4 cup of butter (or 6 ounces).  

Here's a quick price comparison of making my own vs. buying butter.

16 ounces of salted butter - generic brand - $2.27 = .14/oz
16 ounces (1 pint) of Heavy Whipping Cream - $3.39

So taking into account that 1 pint made 6 ounces of butter, it cost me about .56 per ounce.  However, I'm sure I didn't pay that much for my cream.  Plus, my butter tastes better and has fewer chemicals than store-bought.
  

Wednesday, May 19, 2010

Getting Healthy

We're getting healthy around our house.  It's about time!!!!!  We're not making a ton of changes all at once. I want to make sure we have the best shot at keeping this up.  Right now, here's what I'm doing:

  • Eating up all the unhealthy stuff we have in the house.  I can't stand to waste it.
  • No more soda at home.  Hubby and I will save soda for when we eat out.  (The kids don't drink it at all.)
  • I am exercising in the mornings, hopefully before the kiddos wake up!
  • I have eliminated coffee and switched to tea.  I know that a little coffee is not bad for you, in fact, there are some health benefits to it.  I tend to like a little coffee with my cream, though.  So I'll save tons of calories and money by not having to buy cream!
  • Healthier snacks - for me, that means more almonds and walnuts and less junk.
  • Fruits and veggies - we're getting close to being able to harvest some veggies from our garden!!!!  I'm making it a point to eat fruit with lunch every day.
My goal is not to lose a certain number of pounds.  In fact, I'm hoping I can stand to not get on the scale much at all!  My goal is to lose a couple of sizes.  My goal is also to just be healthier in general.  I'm reading a lot about superfoods and the science behind it is really interesting.  I want to change my mindset that food is for energy and being healthy and not just something that tastes good to fill up our bellies.

Organic fruits and veggies - They are expensive.  I was reading THIS article the other day.  It makes me sick.  So I think we will be switching to some organic produce.  We have a great farmer's market here, so I'm hoping I can find some good prices there.

Tuesday, April 20, 2010

4/20 Garden Update

On April 14th, my dog got into my garden beds.  She ate some sprouts and dug around in other beds.  So I've had to replant a lot of plants.  And now there is netting over every bed so that hopefully the dog will stay away!!!


My 4 tomato plants.  They each have a cage for support and there is chicken wire in front of this bed.


Zucchini sprouts!!!!  I need to pull out a few of these, but I'm waiting to make sure that biggest one stays around!


Squash sprouts!  Same thing with thinning these.


These sprouts are getting ready to move outside.  I'm putting them outside for a little while each day to get them used to the sun.  They are:  Forget-me-nots, lettuce, pickling cucumbers and zinnias.


These are still inside.  They are:  slicing cucumbers, 2 varieties of carrots, 2 varieties of lettuce, okra, cumin, and squash.

Friday, April 9, 2010

Garden Status

Well, I never did get the seeds I posted about below.  It's a looooong story!  Do NOT order from the place I linked in that post.

In the end, I was able to get pretty much the same varieties at a local garden center.

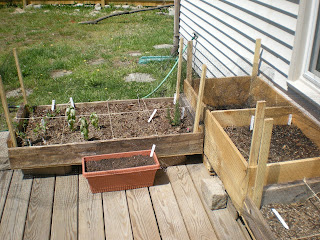
Here are 2 of my beds.  They have plywood bottoms and are on the deck because we are having some major landscaping work done in our backyard soon.  The sides are ugly because my father-in-law gave me some wood scraps.


Here are the other 2 beds.  The one with the new wood is my deeper box for potatoes and carrots.


Some of my sprouties!!!!  The biggest ones are snake gourds.  Luke picked them out.  The others are:  Green Zinnias, Dwarf Sunflowers, and Forget-me-nots.  Luke also picked out the Forget-me-nots because he wanted some blue flowers.


These are my 4 tomato plants.  From Left to Right:  Better Boy, Sweet 100, Early Girl, and Grape Tomatoes.  They just have stakes for now.  Pretty soon they'll need cages.  In front of the tomatoes will be:  yellow squash and zucchini.


In the top left 2 square are onions.  Next to those will be 2 varieties of cucumbers - Straight 8 and Natl. Pickling Cucumbers.  My husband only likes 1 kind of pickles in the world, the kind his grandmother made, so we're working on getting the recipe.  In the front row will be 2 varieties of leaf lettuce, dwarf sunflowers, and green zinnias.
Starting in the top left - Spinach, Multicolored zinnias, Okra, Forget-me-nots.
Bottom left - Parsley, Basil, Cumin, Rosemary.


Monday, March 22, 2010

My New Project ..... Gardening!

So I have a new project to obsess over ....... a vegetable garden.  I'm planning on using the Square Foot Gardening method.  My father-in-law gave me some scrap wood to build most of my boxes.  He even cut it to the size I needed!!!


I decided to use Heirloom seeds.  They aren't genetically altered and you can save the seeds and plant them the following year.  I just placed an order for seeds. A friend recommended Heirloom Acre Seeds.  Here is what I ordered:


Carrots - Tendersweet Carrot and Scarlet Nantes Carrot


Onions - Texas Grano 1015Y Onion and Yellow Sweet Spanish Onion


Cucumbers - Straight Eight Slicing Cucumber and National Pickling Cucumber


Squash - Golden Summer Crookneck Squash


Zucchini - Zucchini, Black


Lettuce - Salad Bowl Green Lettuce and Green Ice Leaf Lettuce


Tomatoes - Ace 55 Tomato and Grape Tomatoes


Okra - Clemson Spineless Okra


Jack-Be-Little Pumpkin - I thought these would be fun for the kids this fall


Cumin


Zinnia, Dahlia Series Mixture

----------------------------------------------------------


I still have to get everything else ..... a few more pieces of wood, herb plants (Basil and Parsley, maybe Cilantro), soil, weed cloth, some sort of cage to keep the rabbits out.


I really hope I'm not being too optimistic on this project.  I have a tendency to get excited about something and get in over my head.  I really want this to work ...... so we'll see!  I'll be sure to post before and after pics .... maybe even in progress pics, too!

Monday, March 8, 2010

Granola Bars

I put mini chocolate chips in these, but feel free to substitute raisins or other dried fruit.  You could even add nuts.

These are pretty sweet.  Next time, I might cut the brown sugar in half.

Ingredients:
2 cups rolled oats (not instant)
3/4 cup packed brown sugar
1/2 cup wheat germ
1 tsp. cinnamon
1 cup all-purpose flour
3/4 cup mini chocolate chips
3/4 tsp. salt
1/2 cup honey
1 beaten egg
1/2 cup vegetable oil
2 tsp. vanilla extract

Directions:

Preheat oven to 350 and grease a 9x13 pan.

Mix together the oats, brown sugar, wheat germ, cinnamon, flour, chocolate chips and salt.

Make a well in the center, and pour in the honey, egg, oil and vanilla.  Mix well.

Using your hands, pat the mixture evenly into the pan.

Bake for 30-35 minutes, until the edges get golden brown.

Cool for a few minutes, then cut into bars or squares.  Don't let them cool completely, or they'll be too hard to cut.

Monday, March 1, 2010

Southwestern Chicken and Rice Casserole

Oh.My.  I have issues with casseroles .... they rarely turn out the way I think they should.  Finally, I achieved success!!!!!!!  I found this recipe on Tasty Kitchen, and I modified it a bit to fit our family.  I've made it twice now and both times, everyone gobbles it up.  Last night, hubby actually said, "This is a really good meal."  He rarely says that, so I knew it was good!!!!!  (He usually says, "It's fine."  To him, that means he likes it.  It took me a while to figure out that It's fine really means It's good.  So for him to say It's good .... that must mean it's great!)

The original recipe is HERE.  I'll put it here the way I made it and I'll put some notes and thoughts at the bottom.

Southwestern Chicken and Rice Casserole

  • 1 (15 Oz.) Can Black Beans, Drained And Rinsed
  • 1 (10.75 Oz.) Can Cream Of Chicken Soup
  • 1 C. Water
  • 1 C. Picante Sauce
  • 3/4 C. Uncooked Long Grain White Rice
  • 1/2 Tsp. Onion Powder
  • 1 (11 Oz.) Whole Kernel Corn Drained
  • 4 Skinless, Boneless Chicken Breast Halves
  • Taco Seasoning
  • Cheddar Cheese


Spray a 13×9 inch baking dish with nonstick cooking spray. Spread drained black beans over the bottom of the prepared baking dish.
Combine soup, water, salsa, rice, onion powder and corn in a bowl; pour over black beans.
Lay chicken on top and generously sprinkle taco seasoning on top of the chicken.
Cover and bake at 375 degrees for 45 minutes or until chicken and rice are done.  Uncover and bake another 15 minutes.
Sprinkle with cheese and return to the oven until cheese is melted.

My Notes
- Instead of the 1 cup of water, next time I might try adding a can of petite diced tomatoes.  Maybe even the ones with green chilies.
- You can use whatever kind of salsa or picante sauce you like.
- I think this would be easy to put together ahead of time and just pop in the oven an hour before dinner.
- If you use brown rice, I'd probably add a bit more water.
- Cheese ..... again, use whatever you like.  Last night, I used a combination of mild and sharp cheddar cheese, only because that's what I already had.  Mexican cheese would be good, too.
- I think this casserole has a lot of possibilities to change it up a bit and to adjust the spiciness to what your family likes.